| Author |
 Topic Topic  |
|
Jennet
Hatchling

United Kingdom
305 Posts |
 Posted - 02/02/2009 : 18:47:13 Posted - 02/02/2009 : 18:47:13

|
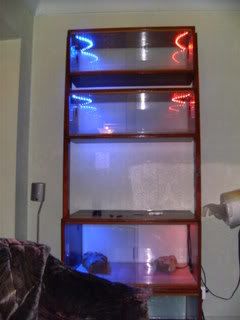
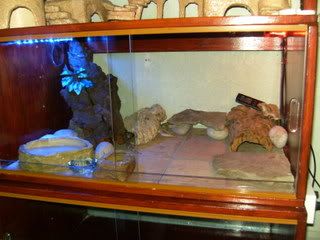
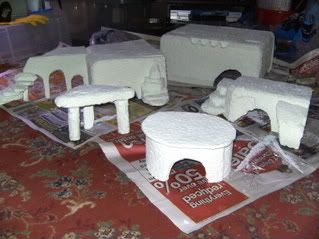
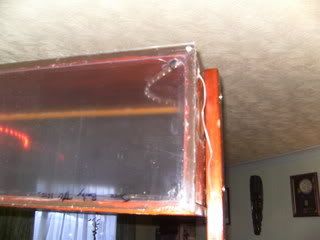
So over christmas, I started to get the stuff together to convert an old bookcase thingymajig from Ikea into a new viv stack for Tango (corn) and Horace (hoggie).... varnished all interior with B&Q floor varnish, attached perspex to back, brought lights, vents and glass runners, and got glass cut for doors yesterday.... result! 
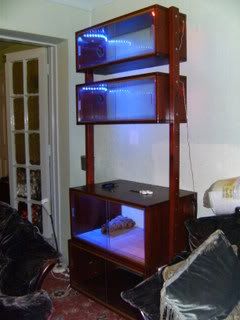
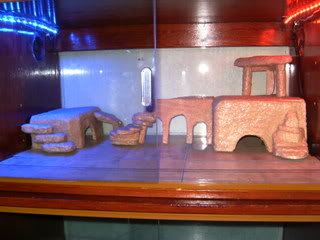
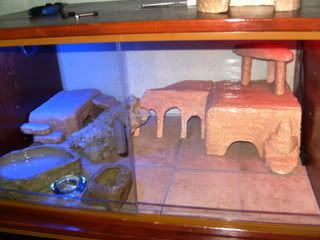
Made some hides out of polystyrene and grout and coated with floor varnish, cos decided I wanted to get some leo's...
Then decided I preferred the more natural look...
sans inhabitants....
with lights on...
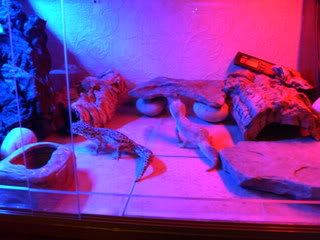
Happy now... just gotta put Tango's and Horace's stuff in, and move toad tank to centre part... 
|


www.thecornsake.co.uk
www.thehognosesnake.co.uk
www.theamphibian.co.uk |
|
|
Tizzy
The Corn Snake Moderator

United Kingdom
1202 Posts |
Posted - 02/02/2009 : 19:49:35
|
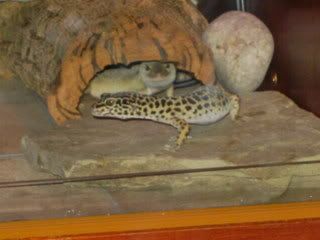
| That looks fab, i think you should go back to your mock romen ruins they're fantastic. How did you make them, (might even give it a go once my hand is back in action). Your leo's are beautiful too. |
3.2.0 corns 0.3.1 Leopard Geckos, 0.1.0 Mad Staffys 1.0.0 Moggie. 1.2.0. Devils in training.

|
 |
|
|
lee2308
The Corn Snake Moderator
United Kingdom
3348 Posts |
Posted - 02/02/2009 : 20:06:51

|
| great job,looks like your very handy. |

 |
|
|
|
gingerpony
Queen Bee

United Kingdom
10455 Posts |
Posted - 02/02/2009 : 20:29:15
|
quote:
Originally posted by Tizzy
How did you make them, (might even give it a go once my hand is back in action).
this is one way to do it:
http://hubpages.com/hub/Fake-Rock-Instructional
btw Jennet, v impressive!  |
cornsnakes, ratsnakes, bullsnakes, boas and day geckos

Location:Leeds/York/Selby area |
|
|
|
Jennet
Hatchling
United Kingdom
305 Posts |
Posted - 02/02/2009 : 22:07:08
|
Thanks folks.. I'm chuffed ...
For the fake hides, I used a poly box from the pet shop I go to, cut to whatever shapes I was aiming for.. some ceiling polysyrene roll (B&Q or similar), cut and shape to whatever you fancy, hold pieces in place with wooden cocktail sticks, grout over very runny first layer to get into all the cracks, add different coloured paint to grout for other layers, so you can see where you've done, chuck a bit of sand over last layer before using clear floor varnish for last two layers, and your done!! Great therapy!!
The link GP gave is a good one, or there are a few on the lizard section on the dark side!! ... really good fun, can do a complete viv in one if you want to (I wanted to be able to get out for cleaning etc.), and costs a whole lot less than the stuff you buy in shops!!... can even make backgrounds in it, or grout little plant pots in there for live plants etc.... jobs a good 'un!! Just be sure to leave it a few days before putting into viv to cure and to ensure all fumes have gone. ... really good fun, can do a complete viv in one if you want to (I wanted to be able to get out for cleaning etc.), and costs a whole lot less than the stuff you buy in shops!!... can even make backgrounds in it, or grout little plant pots in there for live plants etc.... jobs a good 'un!! Just be sure to leave it a few days before putting into viv to cure and to ensure all fumes have gone. |
www.thecornsake.co.uk
www.thehognosesnake.co.uk
www.theamphibian.co.uk |
|
|
|
Blackecho
The Corn Snake Admin
United Kingdom
4379 Posts |
|
|
n/a
deleted
181 Posts |
Posted - 02/02/2009 : 22:59:50
|
That's cool, great work..
The polystyrene hides you made are wicked, makes the viv look like somthin out The Flintstones
Mite try to make my own background out of the stuff
|

0.1.0 Amel Motley corn : CORAL
0.0.1 Ghost corn: CASPER
1.0.0 Royal Python: BLAZE
1.0.0 Yemen chameleon: CHONG
0.0.1 Leopard Gecko: CLEO |
|
|
|
n/a
deleted
110 Posts |
Posted - 02/02/2009 : 23:46:25
|
| They're amazing, love the hides you made too |
 |
|
|
|
Jennet
Hatchling
United Kingdom
305 Posts |
Posted - 02/02/2009 : 23:51:17
|
Only took one pic when I had put first really thin layer of grout on... the big squared off box at back is for my daughers boyfriends boa.... Really easy to do, couldn't be ar**d to round off stones / fake rocks, but have seen others do so, and it is really effective... give it a go... you may surprise yourselves!!
 |
www.thecornsake.co.uk
www.thehognosesnake.co.uk
www.theamphibian.co.uk |
|
|
|
n/a
deleted
362 Posts |
Posted - 03/02/2009 : 09:00:09
|
| That stack is really cool, as are those home made bits and bobs, think I might try that. |

1 Carolina Corn Snake
1 Royal Python |
|
|
|
Leyrielton2
Sub Adult

United Kingdom
1060 Posts |
Posted - 03/02/2009 : 10:35:45
|
| The hides look really good Jennet, Congrats!! I think somebody used to watch Blue Peter when they were younger |
 |
|
|
|
n/a
deleted
362 Posts |
Posted - 03/02/2009 : 12:06:53
|
What do you mean used to?
|
1 Carolina Corn Snake
1 Royal Python |
|
|
|
Jono2411
Yearling

United Kingdom
639 Posts |
Posted - 03/02/2009 : 13:22:28
|
| thats an awesome conversion... nice one! |
|
|
|
dazb
The Corn Snake Moderator
United Kingdom
1278 Posts |
Posted - 03/02/2009 : 13:59:48
|
| hey jennet, if you took anymore pics of the stages im sure we can get it in the DIY section... |
 |
|
|
|
n/a
deleted
137 Posts |
Posted - 03/02/2009 : 22:13:18
|
| where do u get glass form? |
|
|
|
Jennet
Hatchling
United Kingdom
305 Posts |
Posted - 03/02/2009 : 23:08:59
|
| I didn't do a step by step picture guide, as the unit was already there as the base, and was pretty simple to put rest together, but if you want, I could do a quick rundown of all steps and suppliers of various elements if anyone wants, including prices and the bits about drilling perspex and other things that I found out along the way?.... let me know if you think anyone would find this useful.... |
www.thecornsake.co.uk
www.thehognosesnake.co.uk
www.theamphibian.co.uk |
|
|
|
Leyrielton2
Sub Adult
United Kingdom
1060 Posts |
Posted - 04/02/2009 : 16:00:14
|
| Jennet, i think people would definatly benefit from that |
|
|
|
|
n/a
deleted
137 Posts |
Posted - 04/02/2009 : 17:07:30
|
yes please jennet
|
|
|
|
matty18714
The Count of Corniness
United Kingdom
4428 Posts |
Posted - 04/02/2009 : 17:27:00
|
| Go for it jennet |
 |
|
|
|
Jennet
Hatchling
United Kingdom
305 Posts |
Posted - 04/02/2009 : 19:43:35
|
Ok... here goes....
Sealed all wood with large tin of B&Q Clear floor varnish - 4 coats to insides to ensure good waterproof properties for cleaning - cost approx. �18. Still about half a can left, even after using it to do 2 final coats to home made hides.
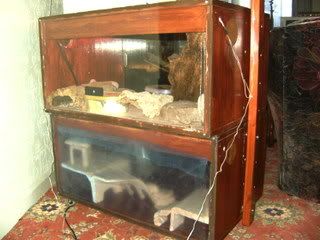
(Protective sheet still on all perspex on viv's not yet using - not tatty edged acrylic... )
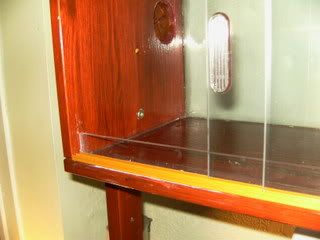
Drilled screw holes in each corner of back pieces perspex, used aquarium grade silicone sealant around back edges of viv and stuck together - attached with screws at corners for extra strength.
Trent Plastics Fabrications, Gainsborough �26.63 for 2 x 780x290mm and 2 x 750x300mm and 4 x 750x30mm for behind sliding glass doors to stop substrate getting in runners and falling all over floor! All 5mm Clear Acrylic
Drilled holes in 4 corners of each using metal drill bit on slow speed to prevent cracking... useful to have someone else with you to hold paintbrush gently against drill bit whilst drilling to clear swarf away whilst drilling. Also put a piece of scrap wood under where you are drilling, this helps prevent movement of acrylic and drill going straight through at last minute and therefore less risk of cracking.
Someone with more confidence and skill may well have been able to cut their own perspex... if you do this, use a stanley knife and straight edge to snap it... if you use hacksaw/jigsaw it is likely to crack or shatter. Sheet perspex by me was extortionate price and very large sizes only, so went for already cut to size.
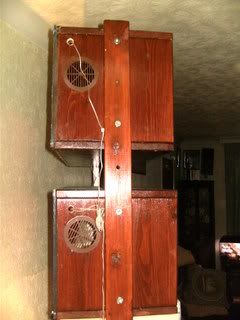
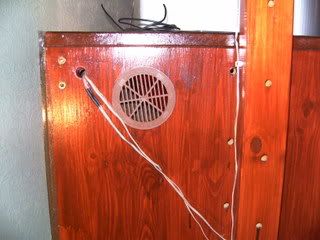
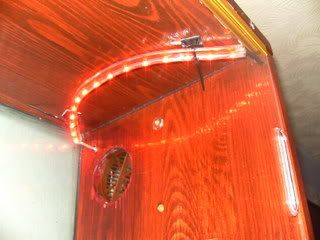
Drilled 70mm holes for vents on top sides of each viv and also large drill bit sized holes to enable me to put lighting strips in.
Ordered vents and glass handles from Loubylou on the dark side. 8 vents and 8 handles cost me �8 'ish I think.
4mm Glass runners off e'bay �4.90 each.... Loubylou does them cheaper, but I wanted brown ones. http://cgi.ebay.co.uk/ws/eBayISAPI.dll?ViewItem&rd=1&item=220333202409&ssPageName=STRK:MERFB:IID
Fitted small stip acrylic to front bottoms using aquarium grade silicone sealant, and sealed all internal joints to enable better cleaning and nowhere for bacteria to build up (or nasty little critters to get out - may have to feed locust and crickets, but don't have to like 'em!)
Fitted glass runners and vents, ordered lighting strips.
Glass from local glaziers who cut and finish (smooth edge). 4mm non toughened glass. �6 per piece for larger doors, �4 per piece for smaller doors �40 all in.
Again glass cutters on e'bay around �4 each if you fancied trying your hand (with my luck I would probably have lost at least one hand in the attempt).... fitted handles off Louby
Lighting strips off ebay �19.49 Had triple set and asked them to allow 3 feet of wire between each strip.... Khellyr knows a shop where you may be able to get them much cheaper, (car kit type I think) but none of these shops in my area
Specialist Lighting UK http://cgi.ebay.co.uk/ws/eBayISAPI.dll?ViewItem&item=150322277727
Fits in straight line on two bottom vivs, but had to curve slightly inwards on top two vivs as narrower....
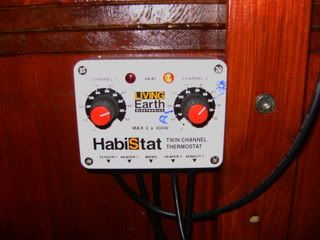
Brought twin channel thermostat off Exotics and Tropics on the dark side �35 each (good bargain - allows me to run two of the mats off one stat) and fitted to side of viv.
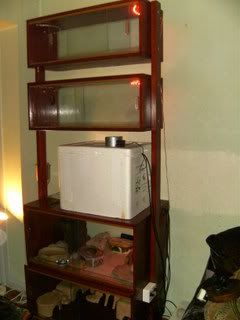
Finished at last, and as you can see from the poly box in the middle section, I've alredy started on my next project which is a home made incubator, as I think at least one of the leo girls may be gravid... |
www.thecornsake.co.uk
www.thehognosesnake.co.uk
www.theamphibian.co.uk |
Edited by - Jennet on 04/02/2009 19:46:40 |
|
|
|
Kazerella
The Corn Snake Admin
United Kingdom
3093 Posts |
Posted - 05/02/2009 : 12:04:16

|
| whoo hoo! babies! |

|
|
|
|
Topic |
|
