| T O P I C R E V I E W |
| LittleMick |
Posted - 18/07/2010 : 19:48:22
Right, just a quick note to get rid of the EDITING FIRST POST ERROR.
Although Elijah hasn't moved into his new viv yet the principles are the same for setting up larger enclosures as they are for smaller ones. Here is the guide for my Hatchling Corn snake setup
http://www.thecornsnake.co.uk/forum/topic.asp?TOPIC_ID=9878
The guide will continue in my second post. |
| 16 L A T E S T R E P L I E S (Newest First) |
| Spacetastic |
Posted - 13/07/2013 : 19:40:56
Really love looking at other people's Vivs and getting ideas for Diego's,also the step by step guide is so useful. I have an antler in Diego's viv, it's hung with leaves and gives an authentic look to his desert scene! |
| Popcorn |
Posted - 06/04/2013 : 00:09:36
Hi where did you get the Vivexotic VX36 from? An hw much? |
| gmac |
Posted - 03/02/2011 : 20:23:08
bit of an old thread
 |
| LittleMick |
Posted - 21/07/2010 : 18:20:44
Hey Hillzi, that's 23 matey, I did however amend the post to say viv rather than fuan as I copied and pasted from my hatchling 101. But thanks for making me double check though.
I decided to keep the back panel as it is for now as I will be investing in a habistat version with a removable plug, and I will end up drilling a hole in the side wall.
My Leos viv will be the next viv to be revamped, it looks abit bare now compared to Elijah's, lol, poor lil bugger. I'll be trying to make hers look more like her natural environment. Will be over on TR for some inspiration. |
| hillzi |
Posted - 20/07/2010 : 14:10:23
Hey Mick mate I've just through of something; maybe something along the depth of the substrate in the ends of the vivarium?
Not too much over the heatmat but slightly deeper going towards to cool end as some snakes may appreciate the opportunity to burrow?
|
| Fal |
Posted - 20/07/2010 : 11:30:25
Nice setup, we have the same make viv, but a little large for our leopard gecko and bearded dragon. The dragon has the cable holes at the top for his lighting cables etc.. but the leo has it upside down with the holes at the bottom for his heat mat/stat etc.. so similar setup for snake and what we're planning to do when we set Bella's up in the VX36. I like the branches being attached to the walls though, and the exo terra backgrounds you've used on the sides is exactly what we did for our leopard gecko, adds such a nice finish and we're planning something similar with Bella's.
Look forward to seeing more pics with Elija in it :) |
| hillzi |
Posted - 19/07/2010 : 17:38:36
Hi Mick, really nice, easy to follow guide! Good ideas there, I especially like the fixing of the branches. |
| LittleMick |
Posted - 19/07/2010 : 16:40:51
quote:
Originally posted by DannyBrown91
Oooh nice set up mick, was thinking ..........
I was going to go with a poly background like the sides, but I was thinking of space and where to attach the hooks and that so I figured a paper one was the way to go. It is actually an aquarium background but to the untrained eye it just looks like a rock outcrop with foliage, lol...... I hope.
quote:
Originally posted by gmac
littlemick this is a really good setup, although have the following comments.
Thread name is a bit misleading as 101 usually means basic or 1st level, this is not the case here, your viv is what i would class as ..........
Palace would maybe more accurate, lmao. I know what you mean about the title, I guess it depends on how you interpret it, being from an army background, 101 just meant intructions but after looking at the terminology on the net your right, unfortunately I can't change the title. BUT! As I knew it was going to be in depth that's why I split it into sections so the can skip the prep work and the decoration part if they want to.
I also though about the lino, but I'm trying to stay away from tiles. Same with my Leo enclosure when I revamp that. No particular reason, I mean if I find it a pain in the butt the way it is I can always change it.
I did know about the humid hide cave as it comes with a bag of sphaggy in there, but I found when Elijah went into shed and I actually spotted it I would put a humid hide in there as well as his cool hide and he never used, so the third one is really an option not a necessity. I won't amend the post as you have already meantioned it now and hopefully new comers will read all the thread.
I spotted the wedges after I bught the lock, lol, never mind, we are here to learn.
quote:
Originally posted by Kehhlyr
I'd put the back on upside down as well, to have the cable runs as close as possible to ...........
Right, don't even laugh at this one, but once I had stuck the background and built the viv, I put the back wall on upside down, so I dismantled it and reassembled it the right way, it never even occured to me to have the holes at the bottom, lmao, oh well. I have lost so much cable length as well. May be when it is due for a clean out I will change it over, just hope the silicone hasn't gone solid, lol. In fact, I have over a month I think, before Elijah moves in so I may do it one weekend. 
quote:
Originally posted by Sta~ple
I'd also say you don't need the cable ties or tell people to check them every so often...........
As I didn't take into account how wide the poly backgrounds the cable ties are tucked behind them so I am hoping I won't have that problem, but we'll see.
Thanks for all the comments and hopefully any future keepers doing genuine research will take the time to read through everything. I realise there are alot of options and definitely cheaper options out there but what I didn't want to do is fill the thread up with ALL options, it's big enough as it is. I think the main aim was to put a "visual" guide up to supplement the main caresheet. When I first started herping it's unbelievable how nervous you can get with a simple instruction such as "put one hide at the warm end", thinking that if you are a millimeter out you'll cook the animal. However, if you see other peoples setups or see step by step images you feel more secure in setting up. |
| Sta~ple |
Posted - 19/07/2010 : 11:49:51
I'd just say that you don't need to seal the mat down, you could just put a heavy hide on it.
I'd also say you don't need the cable ties or tell people to check them every so often. I had cable ties in my old vivs for the bulbs, they fitted flush and my snakes somehow got in though the flush fitting cable and pulled it... now it stretched at least 3 inches lol. |
| Kehhlyr |
Posted - 19/07/2010 : 03:25:30
I'd put the back on upside down as well, to have the cable runs as close as possible to where the probes/mat will fimally end up. This will also give an extra couple of feet slack on the cables externally. |
| gmac |
Posted - 19/07/2010 : 01:20:46
littlemick this is a really good setup, although have the following comments.
Thread name is a bit misleading as 101 usually means basic or 1st level, this is not the case here, your viv is what i would class as luxury possibly even extravegant, of which i have no problem. The hides amd water dish for instance can be simple things like plant pots and cat / dog water bowls all of which are a lot cheaper than exo terra.
instead of using sealant to hold the mat down you could cut a piece of lino to the base size of the viv and use that to hold the mat down also makes cleaning slightly easier.
you have said you havent shown a humid hide in your setup, the hide you have on the right of the setup is a damp hide, all you would do is add the moss when requiered and leave in the hot end this takes away the need for an additional hide to be prepared.
for the locks you could use small rubbe window wedges.
As said above I love this setup mick but certainly not basic. |
| crazy JJ |
Posted - 18/07/2010 : 22:36:10
thats a very nice set-up :D
some good tips there aswell :D |
| DannyBrown91 |
Posted - 18/07/2010 : 22:10:55
Oooh nice set up mick, was thinking about using a paper background in my vivs. |
| LittleMick |
Posted - 18/07/2010 : 22:04:20
Not at all Sta~ple, we have to remember that this imaged caresheet is based on the fact that I haven't actually had an adult in one yet and this is a culmination of what I have read through out the forum. Everybody is free to offer up changes, suggestions or alternatives so we can give new keepers as many options as possible. As with my hatchling setup if anything is wrong I will amend accordingly. |
| Sta~ple |
Posted - 18/07/2010 : 20:50:08
Looking good! Can't believe how decorated your viv is,it is very awesome!
You wouldn't mind if I pointed out some stuff would you? |
| LittleMick |
Posted - 18/07/2010 : 20:21:27
First off, this is NOT a 'must do it this way' guide. There are many ways of setting up enclosures as the members of this forum can point out and show.
A word to the wise, always give sufficient time between setting up your animal enclosure and buying your animal, this gives you sufficient time to test the equipment.
PRE OWNER QUESTIONs & ANSWERS
The following links are threads I posted asking lots of questions before I bought my setup, the equipment list is based on a hatchling setup so ignore that, I will cover equipment in a moment.
My Original Buying List
My Revised Buying List
The general care and keeping of a corn snake can be found on our care sheet at the following link:
http://www.thecornsnake.co.uk/corn_snake_care_sheet.htm
I will split the guide into four sections which are;
SECTION 1: Equipment and preparing the vivarium
SECTION 2: The setup, core essentials
SECTION 3: Pimping out the vivarium
SECTION 4: Securing the vivarium
SECTION 1: EQUIPMENT AND PREPARING THE VIVARIUM
EQUIPMENT LIST
To start with here is a pic of my equipment
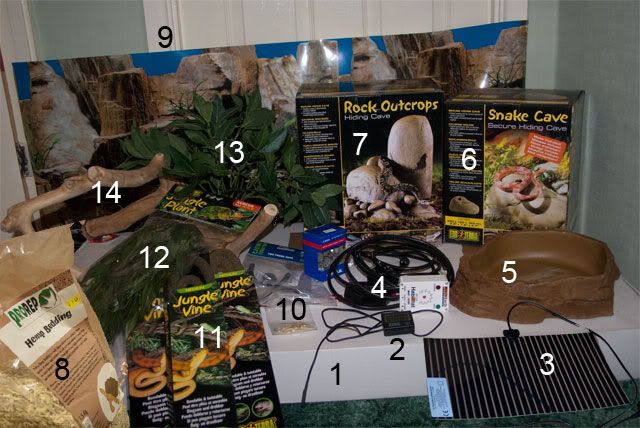
1. Vivarium (3')
2. Digital thermometer (2 would be better)
3. Heat mat 17" x 11" 20w
4. Mat Stat (thermostat)
5. Water dish (extra large)
6. Snake Cave (large)
7. Rock Outcrop (medium)
8. Aspen/Hemp bedding (or other substrate)
9. Background (glossy) (optional)
10. Coat hooks, cup hooks & cable P clips (optional)
11. Bendable jungle vines (optional)
12. Rucus silk vine (large) (optional)
13. Laurel bush (optional)
14. Java branches (optional)
15. 3D backgrounds (60cm x 45cm) (not shown)
16. Humid hide & Sphagnum Moss (not shown)
17. Feeding box (not shown)
I bought my vivarium from Wilkinsons for £70, most of the essentials from 888 Reptiles and the 3D backgrounds, Ivy garland and vivarium lock from Northampton Reptile Center.
PREPARING THE VIVARIUM
This part of the guide is all to do with some preparation work prior to building your vivarium, this will make things easier later on. If you have an already built vivarium you can still use this section, it just means it will be a little more awkward to get things done. If you are not interested in preparing your viv then you can skip straight to SECTION 2: The setup, core essentials.
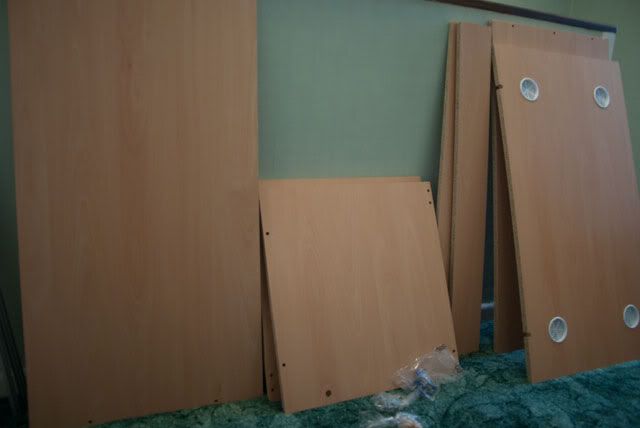
1. If you have bought a flat pack vivarium (Vivexotic VX36) as I did then unpack it, check that all components are correct and clean the surfaces down.
2. I bought some Java branches with bolts in them to mount into the vivarium walls.
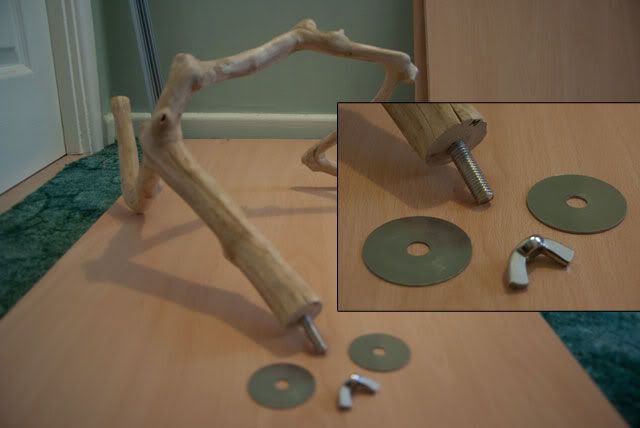
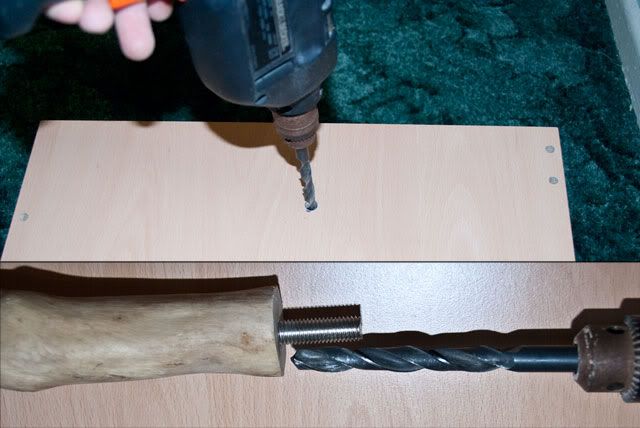
The first thing we will do is drill the holes to mount these branches.
3. I chose to drill 4 holes, 1 on each of the side walls and 2 in the back wall (1 high and 1 low). We won't be mounting branches in ALL holes but having 4 gives us the option to change things around. I found that 2 branches in the viv at any 1 time is quite enough or it gets too crowded. So, hold the branch over the walls in turn, rotate them around to make sure they fit correctly and mark the position with a pen.
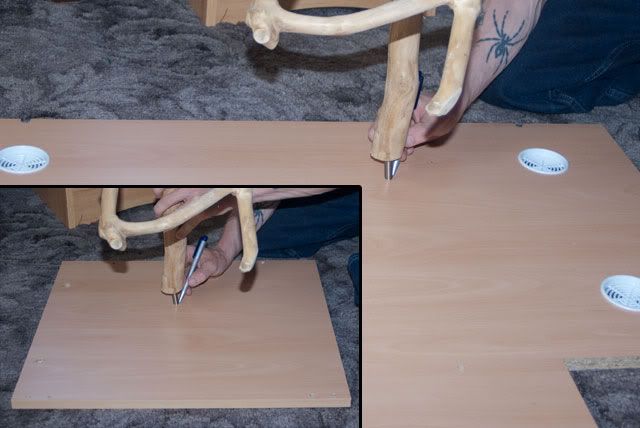
4. Using a drill bit the same size as the Java branch bolt, drill the holes you have marked out in step 3.
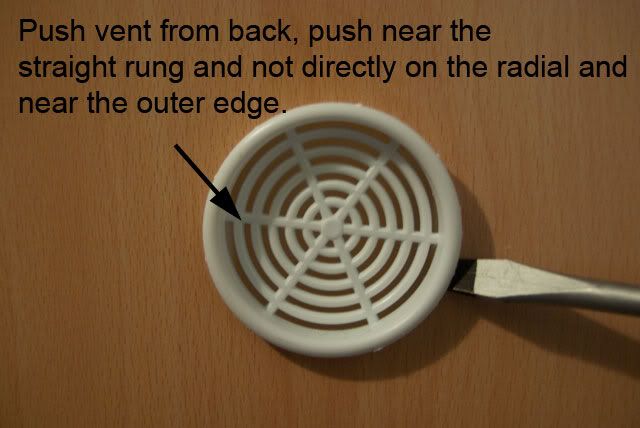
5. Now you need to remove the vents from the viv if they are already inserted, the VX36 has 4. Be careful when removing these and they can break easily. Push them from the back and when there is a sufficient gap use a flat headed screwdriver.
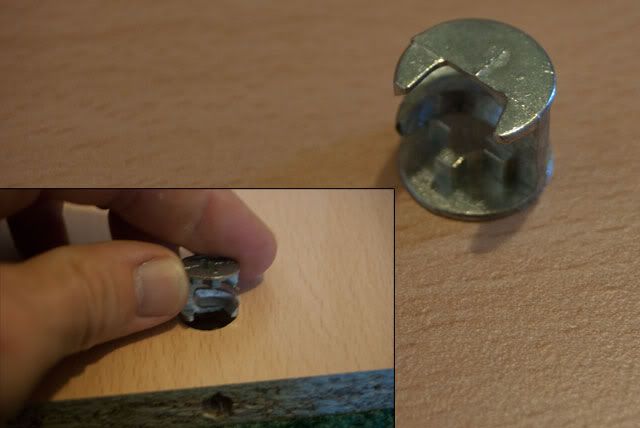
6. If your viv has them, then insert the cams that help hold the viv together.
7. I bought a Glossy Paper Background from my LFS (Local Fish Store), having a flat packed vivarium makes this step easier. Silicone the background to the back wall of the viv.
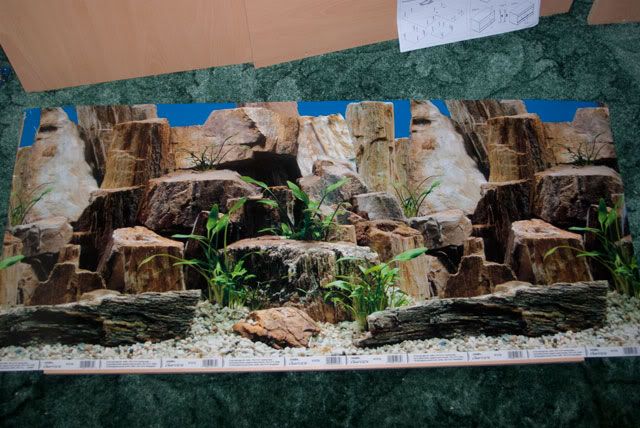
SILCONE WARNING! When fresh, silicone produces a very strong smell, use in a well ventilated area. You should also allow a minimum of 24 hours for it to dry.
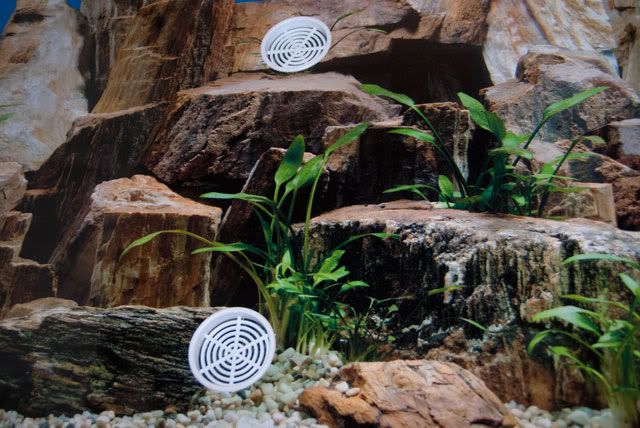
8. Find where the vent holes are and cut the shape of the vent out of the background.
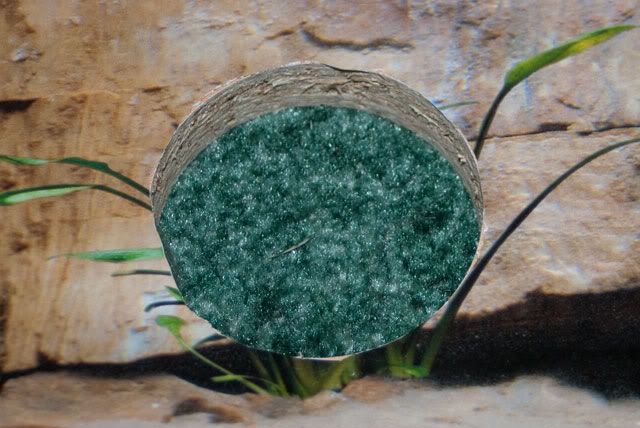
9. Re-insert the vents. If necessary silicone them in place.
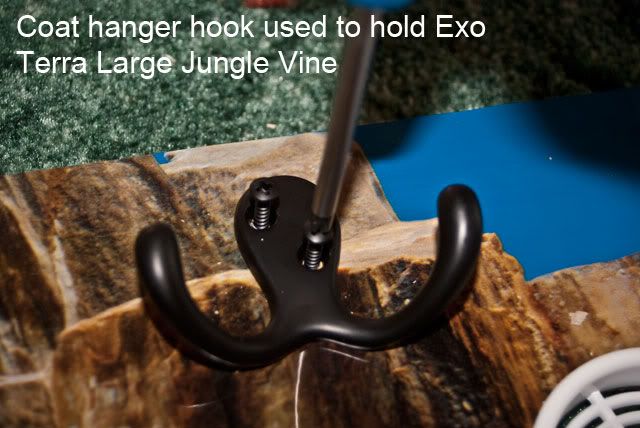
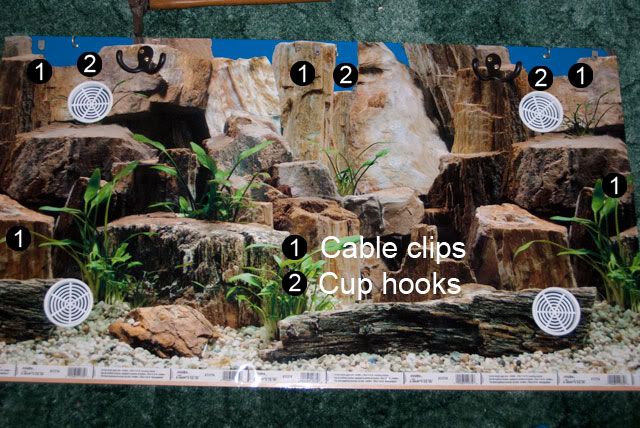
10. As I will be mounting some Exo Terra Large Bendable Jungle Vines in the viv I used some coat hooks to hold them in position at 2 points in the viv. These can be purchased from any DIY store. I mounted 2 approximately 4-5" in from the top corners of the back wall.
11. At various points on the viv back wall I also screwed in some cup hooks and cable P clips. Also purchased from any DIY store. The cup hooks will be for the Exo Terra Small Bendable Jungle Vines and the cable P clips will be for cables or hanging silk vines.
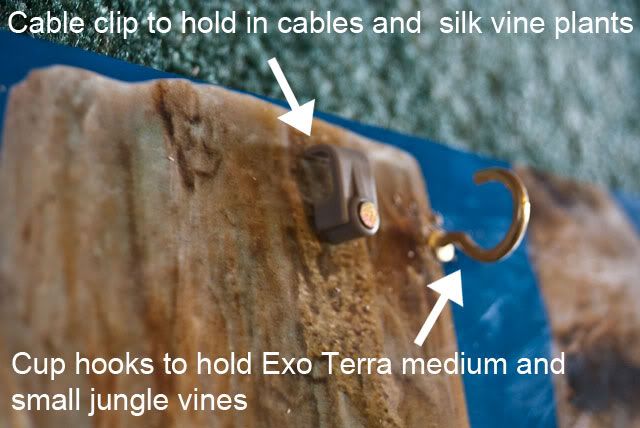
12. Below shows where I have the cup hooks and cable P clips.
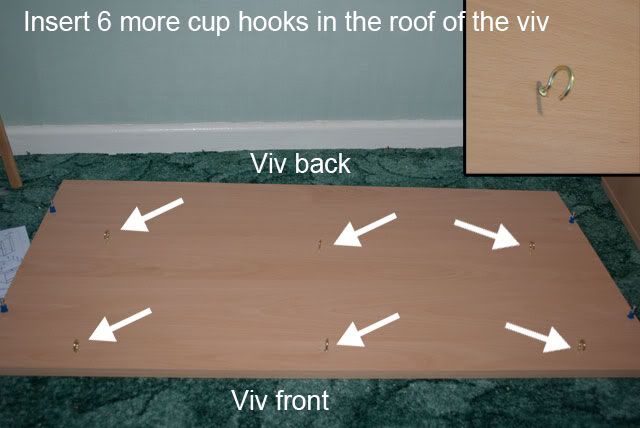
13. I mounted another 6 cup hooks in the inside of the roof of the viv.
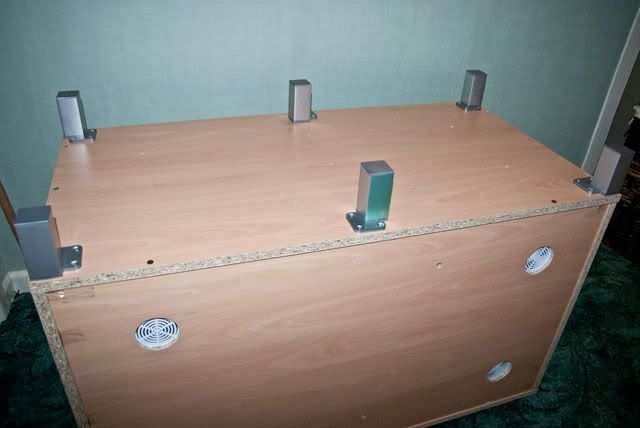
14. Now is the time to build your viv and mount any legs you have.
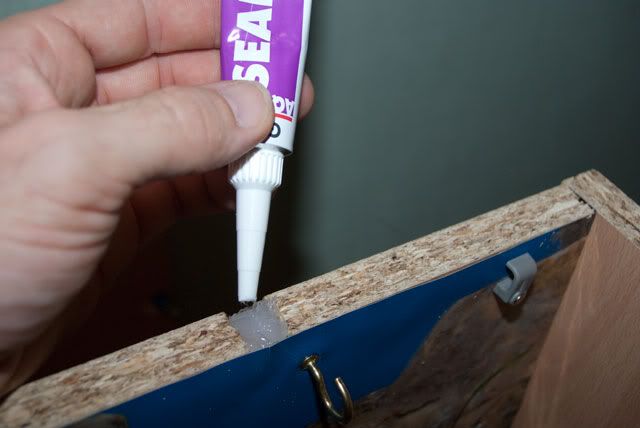
15. If you have the VX36 you should now silicone any of the cable outlets at the top of the back wall that you are not planning on using. If you are purchasing a full grown Corn snake this shouldn't be necessary.
The next step is both part of the preparation and the core essentials setup.
SECTION 2: THE SETUP, CORE ESSENTIALS
16. Place your heat mat (Ultra Therm 23"x11" 21.5w) in the vivarium at one end. Size guide for the heat mat is, the heat mat should cover 1/3 to 1/2 of the floor of the enclosure. As the mat is inside the viv you should silicone it in place to stop snakey from burrowing under it. And if you have a flat packed viv, then silicone around the edges to make a water tight seal. Yes, I know we haven't put the roof on yet, lol, we'll do that in a minute.
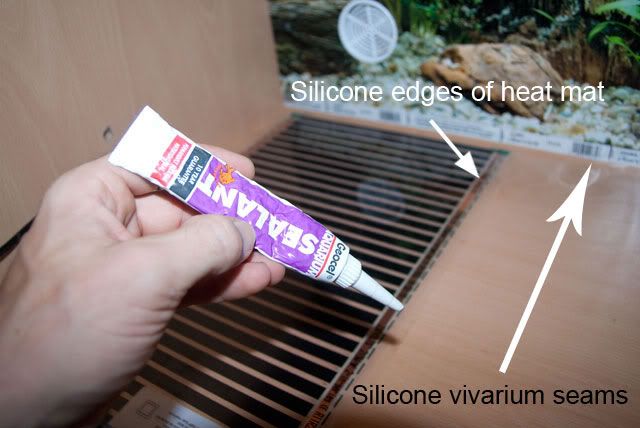
SILCONE WARNING! When fresh, silicone produces a very strong smell, use in a well ventilated area. You should also allow a minimum of 24 hours for it to dry.
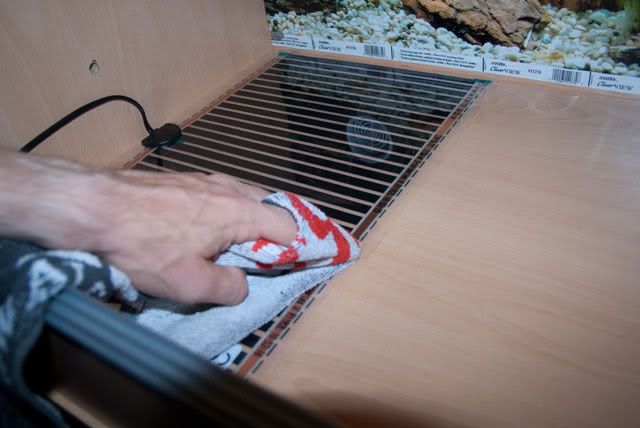
17. Using a rag or kitchen towel wipe out the excess silicone, this also pushes it further into the gaps and produces a smooth finish to the silicone.
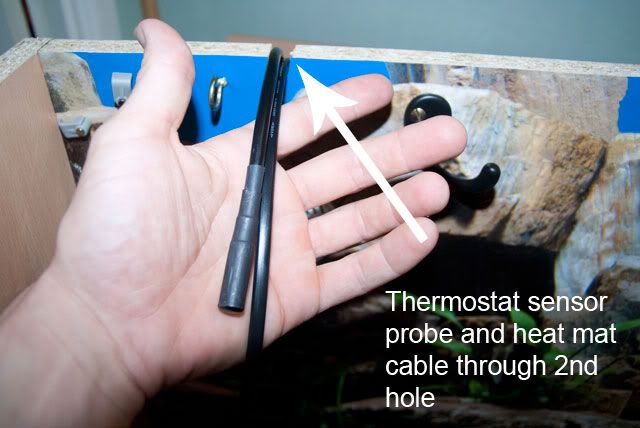
18. MOULDED PLUGS - If you have a heat mat that has a moulded plug AND you have the VX36, then rest the cable for the heat mat and the thermostat sensor (Habistat Mat Stat) in the hole in the top of the back wall that was not siliconed.
19. Using the cable P clips hold the cables in place. You can now put the roof on the viv, secure it with the cams and then seal it with silicone.
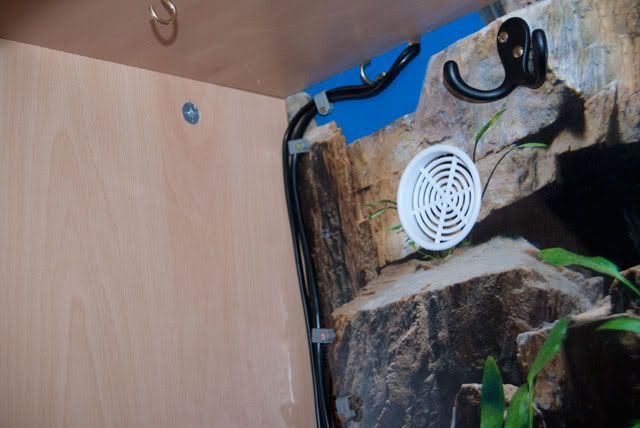
20. NON MOULDED PLUGS - If you have a heat mat where the plug is not moulded and can be removed or you have a heat mat with a moulded plug and you cut it off and replace it with an unmolded one you can drill a hole in the side wall near the point where the cable comes out the heat mat. Make sure this hole is big enough for both the heat mat cable and thermostat cable and maybe the thermometer cable. The thermometer cable is too short to go through the back wall holes in the VX36 so I ran them through a little cutting in the door runner.
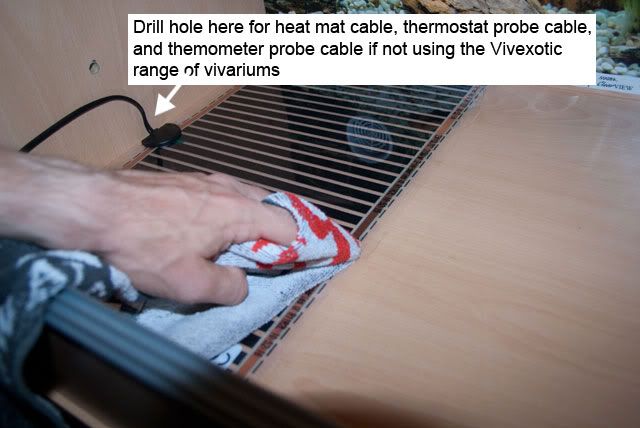
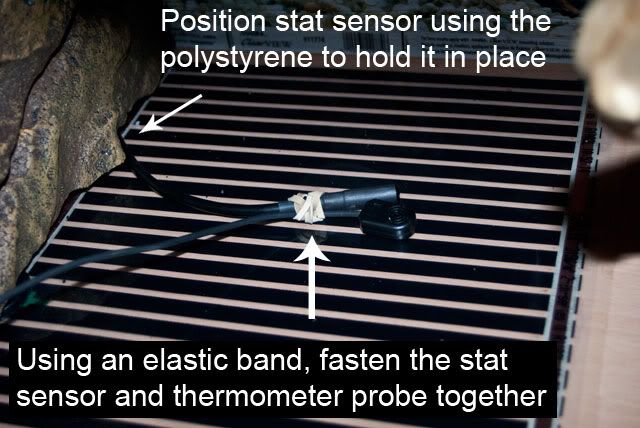
21. Place the stat probe in a horizontal position in the center of the heat mat or where the warm hide will be, using an elastic band, laggy the stat probe and thermometer (Exo Terra Digital Thermometer) probe together so they take readings from the same spot. You can silicone these to the heat mat or hold them in place by placing the warm hide on top of it. I have 3D backgrounds on my side walls so these helped keep the cables in place as well.
22. Plug the heat mat plug in to the thermostat socket. Plug in the thermostat plug in to the electrical supply to power up. Using a flat headed screwdriver turn the dial on the thermostat to the desired temperature. 29c is a good starting point.
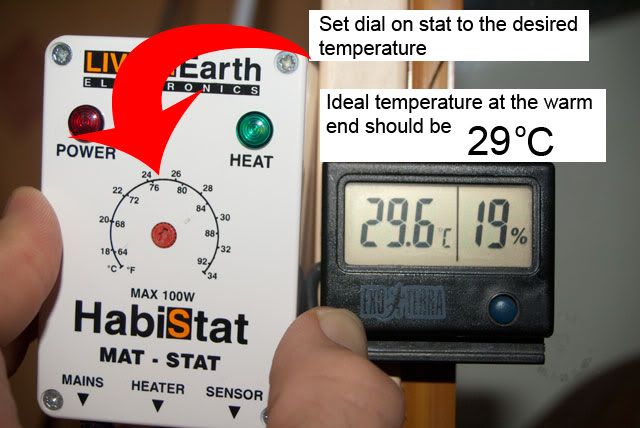
Thermostats are renowned for being inaccurate, so go by what it says on the thermometer. There is a topic about stat dials and temperature reading clashes here:
http://www.thecornsnake.co.uk/forum/topic.asp?TOPIC_ID=7617
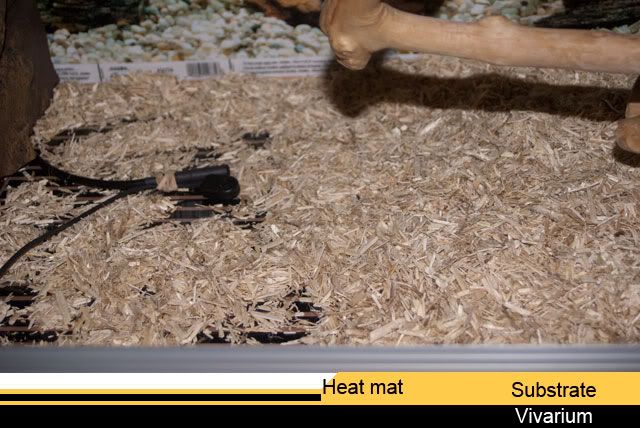
23. Place your substrate (Pro Rep Hemp Bedding) in the bottom of the viv. I used Aspen/Hemp bedding. But the choice is yours, some people use paper towels, newspaper or wood chip. The reason I chose Aspen is because corn snakes like burrowing and Aspen seems to hold well. For more options on substrates please visit the care sheet. If you are using a particulate substrate (Aspen/Wood Chip) you must also be aware of the risks of IMPACTION, animals eating substances they cannot digest properly causing intestinal problems and possibly death. You should be more aware of this fact if you plan on feeding your snake in its enclosure. When putting your particulate substrate in the viv, have a nice thick layer 1"+ at the cool end, then a thin layer at the warm end especially under the hide. In the image below you can still see the heat mat through the substrate.
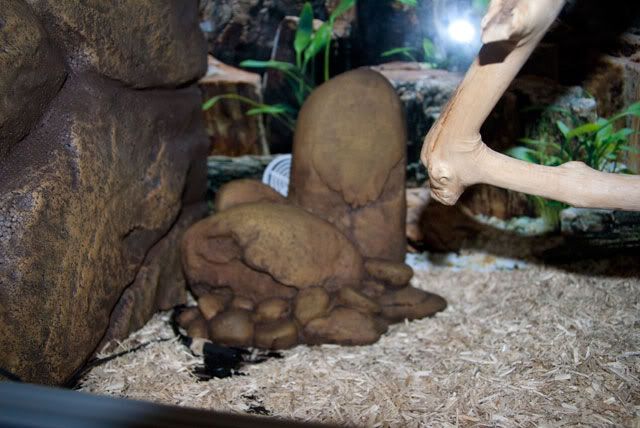
24. Now place one of your hides (Exo Terra Rock Outcrop Medium) at the warm end above the heat mat. I used the Exo Terra Rock Outcrop and not the snake cave for this end as it has no bottom so snakey can get closer to the heat while giving him some cover for security. You could also just use the standard ET Hide or any other hide. If you are getting an adult and not upgrading from a hatchling setup you should go for the larger hides.
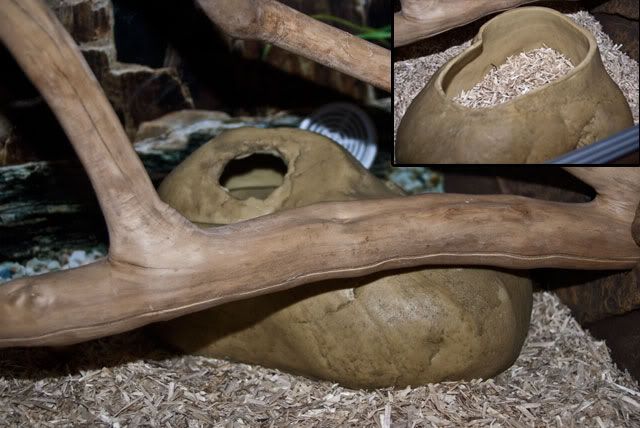
25. Place the other hide (Exo Terra Snake Cave Large) at the cool end of the viv. If you want you can place some bedding in the cave.
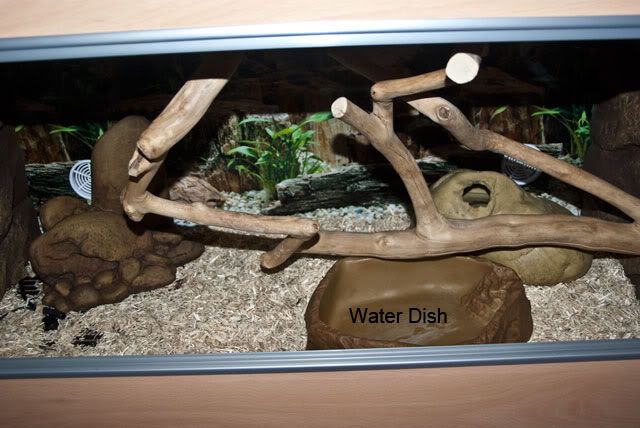
26. Place the water dish (Exo Terra Water Dish Extra Large) at the cool end of the faun. Don't place the water dish at the warm end as this might affect the humidity of the enclosure. I will probably downgrade the water dish to the large on OR I will have to move the Java branch to the other side of the viv as it impedes the removal and inserting of the water dish. A lesson to be learned while designing the viv interior.
SECTION 3: PIMPING OUT THE VIVARIUM
Ok, we have the bare essentials for the viv, you could get away with this setup, but we want snakey to feel more secure and we want the viv to look really nice. So the next few steps will cover putting some decoration and cover in the viv.
27. If you are using 3D backgrounds then go to step 28 first. If you are not using any 3D backgrounds then now is the time to attach your Java branches to the walls, at this time I used 2, 1 in the side wall and 1 in the back wall. The 1 in the side wall will be moved to the other side or replaced with a branch that fits better without impeding the removal of the water dish. The Java branches are attached using a bolt coming out of the branch with 2 washers to go on either side of the wall then fastened with a butterfly nut.
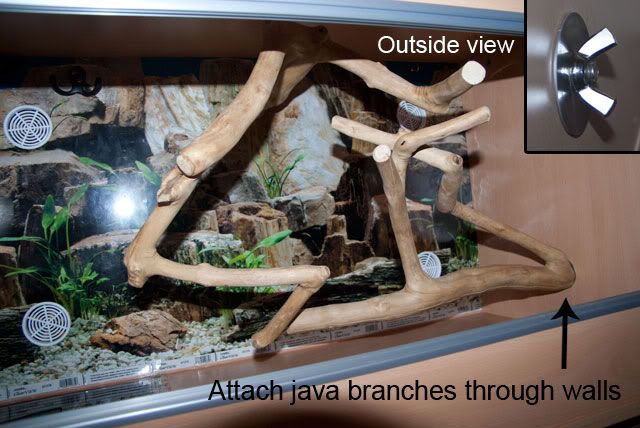
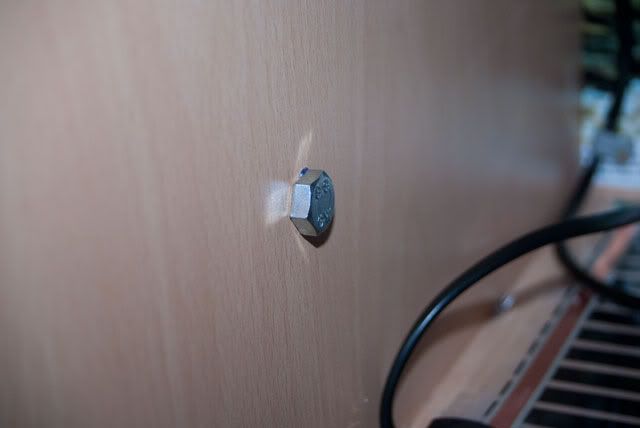
If you are not putting Java branches through all the holes then put a bolt and nut through the vacant holes as shown below.
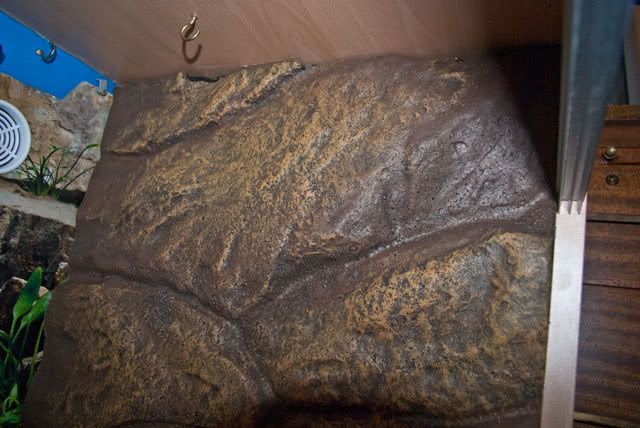
28. I am using 4 3D backgrounds (Exo Terra Background 60cm x 45cm) on the side walls of the viv. 2with holes in them and 2 with no holes in them. I cut these down to size, be careful not to cut them TOO small because you want them tight fitting so snakey can't get behind them.
29. Once you have cut the backgrounds down to size you need to mark where the holes in the walls will be on them. Then take a lighter and melt a hole through the background making it the same size as the root of the Java branch. Also run the lighter down the edge you cut to make it a harder and smoother finish.
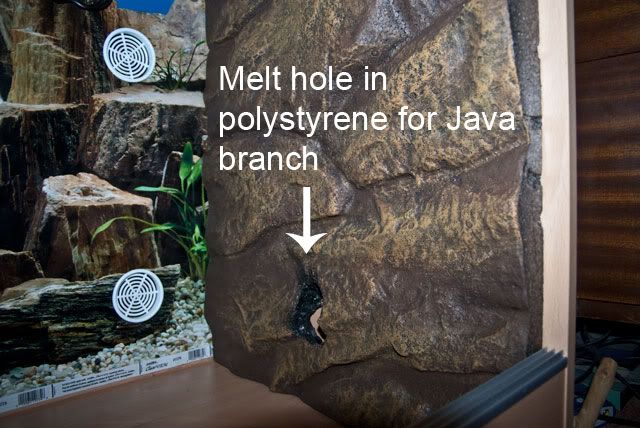
TOXIC FUMES WARNING! When melting polystyrene it produces toxic fumes, do this step in a well ventilated area.
30. I used some vines (Exo Terra Bendable Jungle Vines Small, Medium and Large) in Elijah's viv. As it can be a really tight squeeze trying to twist and turn the vines while in the viv, I removed all the Java branches, hides and water dish. Then I took the large vine and bent it into its approximate position, then I wrapped a medium vine around it. Where the large vine is held by the coat hooks I left a gap between the 2 vines.
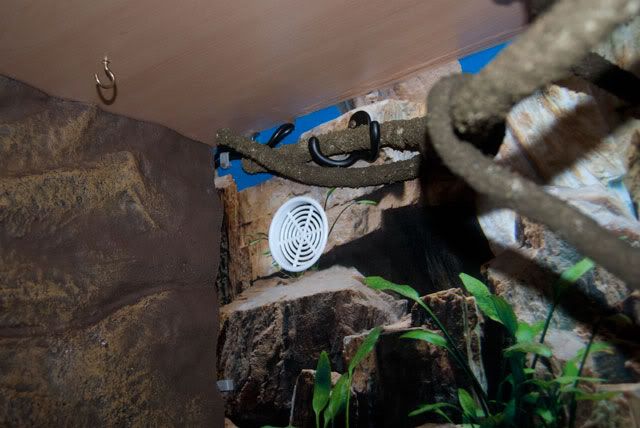
Then using a small vine I inserted this first in one of the cup hooks in the ceiling, ran around the viv and bent a medium vine around it.
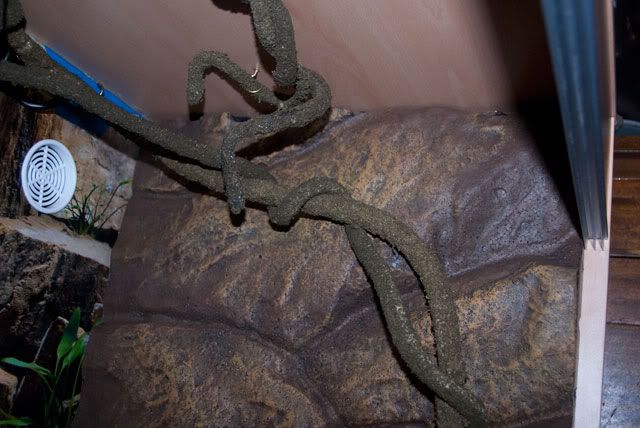
I wrapped all these vines in such a way that they can be removed in the 2 sets I put them in.
31. I then wrapped an Ivy Garland (Artificial Holland Ivy Garland) through and around the vines.
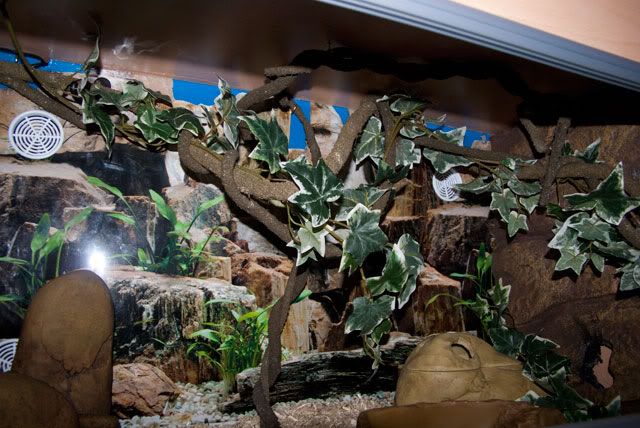
32. Now you can put everything back in including the Java branches.
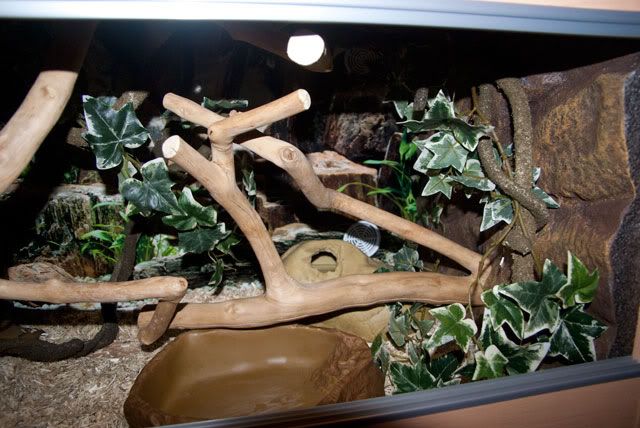
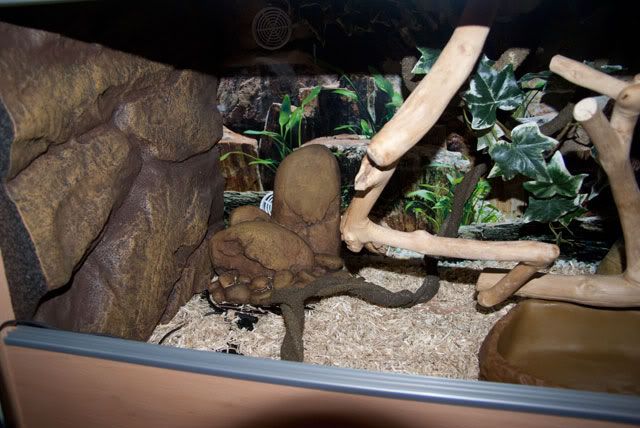
That's all the decoration setup. You don't need your setup to be as elaborate as this but something for your snake to hide behind/under and just something to give your viv a little pizzazz.
SECTION 4: VIVARIUM SECURITY
Now we have put all the essentials and decoration in we need to make sure the snake cannot get out.
33. Put 1 of the glass doors into the runners.
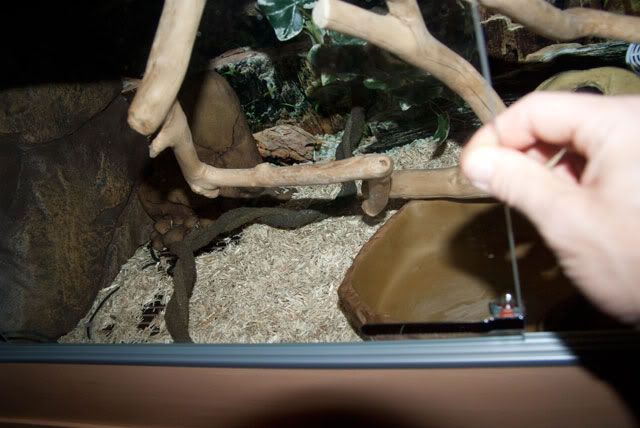
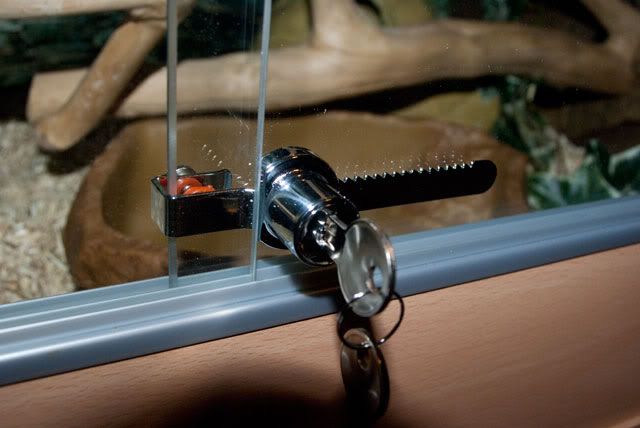
34. Attach the lock (Pro Rep Vivarium Lock 100mm) to the door using the screw. Although it still functions I need to get a larger one, maybe a 130mm one. After installing the lock, insert the other door.
35. Another tip for security is the door cardboard trick. Some members have found that their snakes can fit through the gaps in between the glass doors if the gap is wide enough. So take a strip of cardboard the same height as the doors just above the lock, fold it in half or into thirds, then insert it between the gap in the doors. This prevents your snake feeling adventurous.
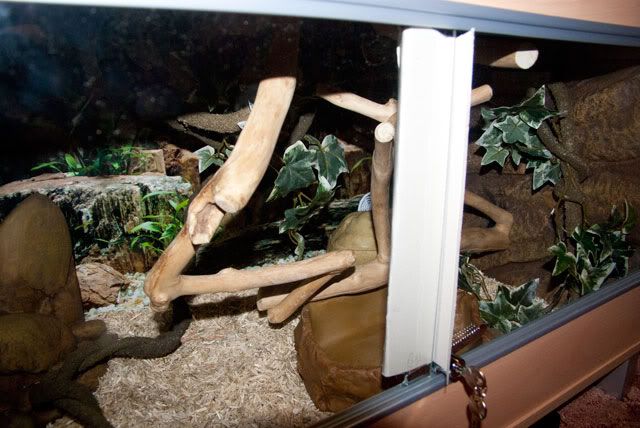
The full topic on this subject can be found at the following link courtesy of Kehhlyr;
http://www.thecornsnake.co.uk/forum/topic.asp?TOPIC_ID=6641
36. Now your snake is ready to move in.
A NOTE ON SHEDDING
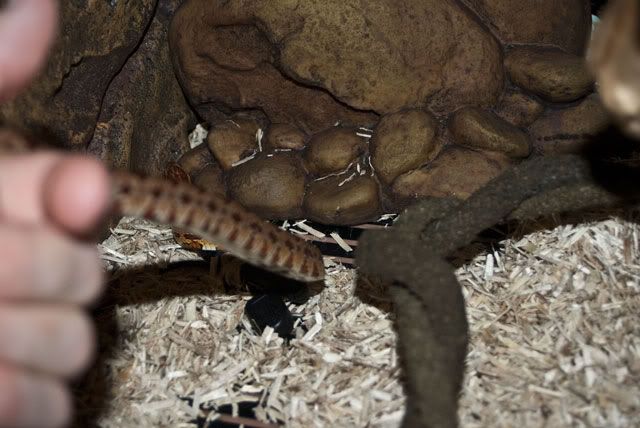
You may have noticed that I did not include a humid hide in my setup pic, currently I am using make shift ones. For Elijah as a hatchling I use a washed out coffee mate jar and for my Leopard gecko I used a washed out curry tub. You don't need to use this hide until your snake goes to shed, you may not even need to use it at all. Elijah had 2 sheds without using it, although these sheds did come off in 2 pieces, breaking in 2 at the vent. But when you notice your snakes eyes are blue (coming into shed) you can put a humid hide in the enclosure to raise the humidity, snakey might even stay in the hide for a day or so until he is ready to shed. You can use anything for a hide, buy one or make one. The image below shows my Leopard geckos hide. Made from an old curry tub, with a hole cut into it. The edges filed smoother and either taped or silicone coated to protect the animal from abrasions. Please be aware when using tape. On my snakes humid hide I don't use tape, I just use a washed out coffee mate jar with no lid on it. Place some moist Sphagnum Moss in the hide.
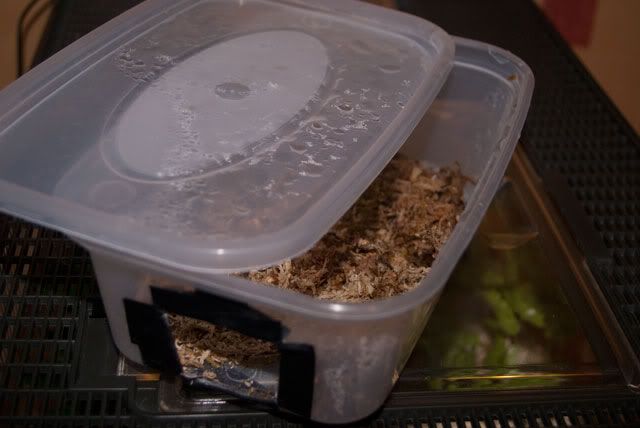
Another method of raising humidity is to move the water dish to the warm end of the faun.
Storing your sphagnum moss
The bags of moss usually come all in one pack and you won't use it all in one session, to stop it drying out split it up into smaller portions, put them into sealable freezer bags and keep them stored in a freezer, this will stop any spread of bacteria.
A NOTE ON FEEDING, WEIGHING & MEASURING
You can feed your snake either in the enclosure or in a separate feeding tank. I do both. If you do feed in the enclosure and are using a particulate substrate, please be aware of the risks of impaction and use a feeding dish, carpet tile, paper towel or similar material. Place the prey item on this then snakey can eat in safety. Also make sure that the material used is large enough to make sure that if the snake flips the prey about it stays within the bounds of the feeding aid. I use a feeding dish (Zoomed).
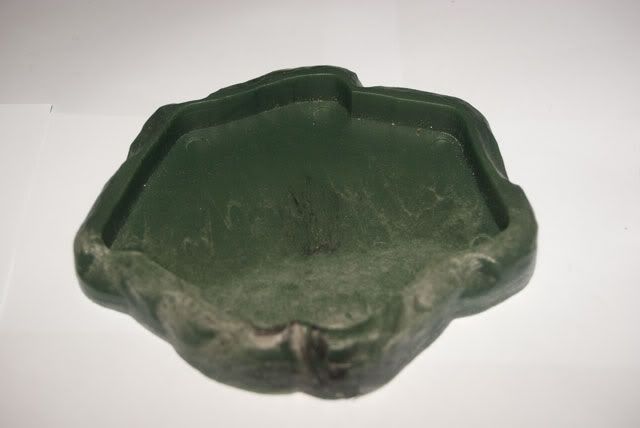
If you are feeding in separate enclosure you can use one of these.
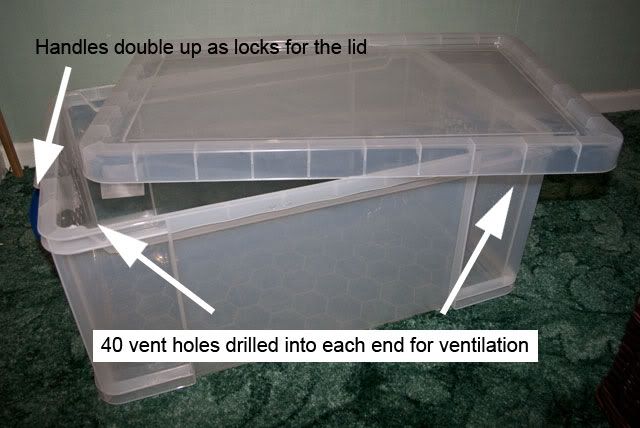
A RUB (Really Useful Box), purchased from some stationary stores, DIY stores or 99p stores. You can also use these as houses for you snakes as long as it has adequate ventilation. I drilled out 40 holes at each end to allow adequate ventilation.
What Size Prey Do I Feed My Snake?
There is a size guide here that you can use:
http://www.thecornsnake.co.uk/forum/topic.asp?TOPIC_ID=7003
BUT! This is only a guide, it will depend on your snake. The general rule of thumb is, that if there is no bump showing in the snakes body after feeding then it's time to upgrade, but the prey item should be no more than 1.5 x the size of the widest part of the snakes body, near the middle.
WEIGHING & MEASURING
Now your snake is happy in his/her home and feeding well you want to keep track of how well it is doing and how big it is getting. Luckily Elijah is still small enough to be weighed in his small feeding box, but when he out grows this I will measure him in the RUB, the principles are the same.
I use a small animal/fish tank. Elijah goes in here if I am doing any maintenance on his faun, or I want to weigh, measure or feed him. This section will be amended once I start measuring him in the RUB.
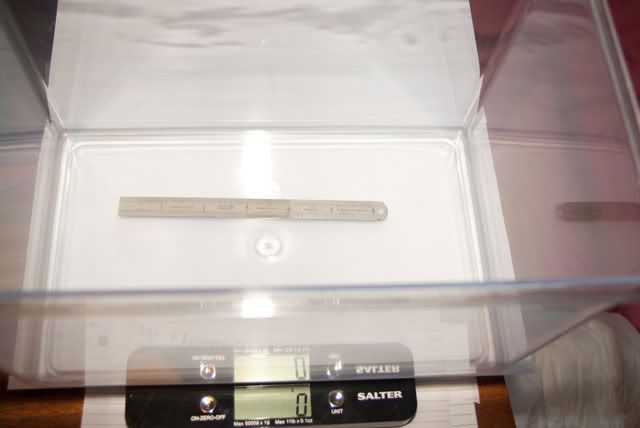
The box cost about £6, the RUB I got was a 64L one for about £15 To measure and weigh him I use some digital kitchen scales from Amazon:
http://www.amazon.co.uk/Salter-Design-Electronic-Platform-Kitchen/dp/B000ZNM51O/ref=sr_1_1?ie=UTF8&s=kitchen&qid=1275249192&sr=8-1
and a 6" ruler from any stationary store. You can use a snake measuring tool called, surprisingly Snake Measurer. You can download it here
http://www.serpwidgets.com/Apps/measure.html
Set up your scales, lay a piece of white A4 paper over them, place the box on them, place the ruler in the box. Turn the scales on so the combined weight is set to 0g. Put snakey in the box, record weight. Now take a photo from above.
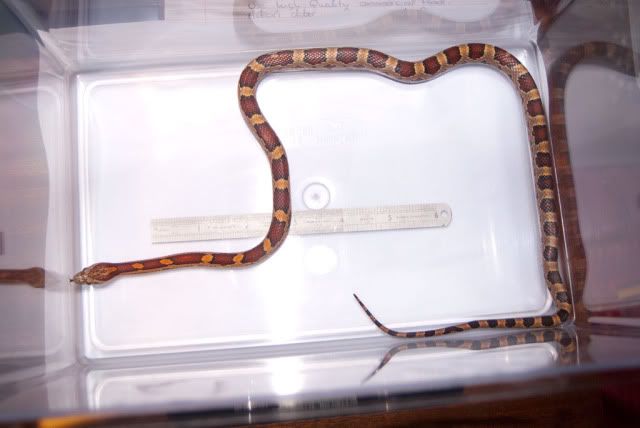
Use this photo in the snake measuring program to get his length.
SNAKE RECORDS
Although it is NOT compulsory, it is handy to keep records, just in case you want help from other members, vets, if you want to breed and such. So you may want to keep the following records
• Age of snake
• Date of purchase
• Date of feeding including size and weight of prey
• Date of shedding
• Weight at time of feeding
• Length at time of feeding
• Problems or comments
Well, that's my 101 finished, sorry it was so long. I hope you enjoyed it and found it informative. Don't forget this is only one way of how to set up an adult corn snake.
Feel free to ask any questions about it, or if you think I have left something out or want to offer up any alternatives then go ahead.
If you want some inspiration from other members you can view their setups here
http://www.thecornsnake.co.uk/forum/topic.asp?TOPIC_ID=6324
Happy herping.
|
|
|

